pipe (09,10)
什麼是 Pipe?
Pipe 經常被用來處理使用者傳入的參數,比如:驗證參數的正確性、型別的轉換等。它有點像是客人畫完點餐單之後,服務生要進行點餐單的檢查。
Nest Pipe
在 Nest 中,Pipe 支援 Exception 的錯誤處理機制,當在 Pipe 拋出 Exception 時,該次請求就 不會 進入到 Controller 對應的方法裡,這樣的設計方法能夠有效隔離驗證程序與主執行程序,是非常好的實作方式。
!https://ithelp.ithome.com.tw/upload/images/20210324/20119338CqPFuiYMnl.png
Nest 內建了以下幾個 Pipe 來輔助資料轉型與驗證:
ValidationPipe:驗證資料格式的 Pipe。ParseIntPipe:解析並驗證是否為Integer的 Pipe。ParseBoolPipe:解析並驗證是否為Boolean的 Pipe。ParseArrayPipe:解析並驗證是否為Array的 Pipe。ParseUUIDPipe:解析並驗證是否為 UUID ��格式的 Pipe。DefaultValuePipe:驗證資料格式的 Pipe。
使用 Pipe
Pipe 的使用方式很簡單,假設要解析並驗證路由參數是否為 Integer 的話,只需要在 @Param 裝飾器填入路由參數名稱並帶入 ParseIntPipe 即可。以 app.controller.ts 為例,如果 id 解析後為數字,就會透過 AppService 去取得對應的 User 資訊,否則會拋出 Exception:
import { Controller, Get, Param, ParseIntPipe } from "@nestjs/common";
import { AppService } from "./app.service";

@Controller()
export class AppController {
    constructor(private readonly appService: AppService) {}

    @Get(":id")
    getUser(@Param("id", ParseIntPipe) id: number) { // 使用 pipe
        return this.appService.getUser(id);
    }
}
調整 app.service.ts:
import { Injectable } from "@nestjs/common";

@Injectable()
export class AppService {
    getUser(id: number) {
        const users = [
            {
                id: 1,
                name: "HAO",
            },
        ];
        const user = users.find((x) => x.id === id);
        return user || {};
    }
}
透過瀏覽器查看 http://localhost:3000/HAO 會收到錯誤訊息,因為路由參數為 HAO,並不能解析為 Integer:
{
    "statusCode": 400,
    "message": "Validation failed (numeric string is expected)",
    "error": "Bad Request"
}
內建 Pipe 自訂 HttpCode
假設想要更改錯誤訊息,那 ParseIntPipe 就必須實例化並帶入相關參數,以 app.controller.ts 為例,我希望出錯時收到的 HttpCode 是 406:
import { Controller, Get, HttpStatus, Param, ParseIntPipe } from '@nestjs/common';
import { AppService } from './app.service';

@Controller()
export class AppController {
  constructor(private readonly appService: AppService) {}

  @Get(':id')
  getUser(
    @Param('id', new ParseIntPipe({ errorHttpStatusCode: HttpStatus.NOT_ACCEPTABLE }))
    id: number
  ) {
    return this.appService.getUser(id);
  }

}
透過瀏覽器查看 http://localhost:3000/HAO 會得到下方結果:
{
  "statusCode": 406,
  "message": "Validation failed (numeric string is expected)",
  "error": "Not Acceptable"
}
內建 Pipe 自訂 Exception
如果想要自訂錯誤訊息的話,可以使用 exceptionFactory 這個參數來指定產生的 Exception。以 app.controller.ts 為例:
import { Controller, Get, NotAcceptableException, Param, ParseIntPipe } from '@nestjs/common';
import { AppService } from './app.service';

@Controller()
export class AppController {
  constructor(private readonly appService: AppService) {}

  @Get(':id')
  getUser(
    @Param(
      'id',
      new ParseIntPipe({
        exceptionFactory: () => new NotAcceptableException('無法解析為數字')
      })
    )
    id: number
  ) {
    return this.appService.getUser(id);
  }

}
透過瀏覽器查看 http://localhost:3000/HAO 會得到下方結果:
{
  "statusCode": 406,
  "message": "無法解析為數字",
  "error": "Not Acceptable"
}
自訂 Pipe
如果覺得內建的 Pipe 無法滿足需求的話,Nest 是可以自訂 Pipe 的,事實上,Pipe 就是一個帶有 @Injectable 的 class,不過它要去實作 PipeTransform 這個介面。Pipe 可以透過 CLI 產生:
$ nest generate pipe <PIPE_NAME>
注意:
<PIPE_NAME>可以含有路徑,如:pipes/parse-int,這樣就會在 src 資料夾下建立該路徑並含有 Pipe。
這邊我建立一個 ParseIntPipe 在 pipes 資料夾下:
$ nest generate pipe pipes/parse-int
在 src 底下會看見一個名為 pipes 的資料夾,裡面有 parse-int.pipe.ts 以及 parse-int.pipe.spec.ts:
!https://ithelp.ithome.com.tw/upload/images/20210324/20119338MBYJXIgGov.png
下方為 Pipe 的骨架,會看到有一個 transform(value: any, metadata: ArgumentMetadata) 方法,這就是要做邏輯判斷的地方,其中,value 為傳進來的值,metadata 為當前正在處理的參數元數據:
import { ArgumentMetadata, Injectable, PipeTransform } from '@nestjs/common';

@Injectable()
export class ParseIntPipe implements PipeTransform {
  transform(value: any, metadata: ArgumentMetadata) {
    return value;
  }
}
注意:PipeTransform 後面可以添加兩個 Type,第一個為 T,定義傳入的值應該為何種型別,也就是 transform 裡面的 value,第二個為 R,定義回傳的資料型別。
這裡我們調整一下 parse-int.pipe.ts,經過 parseInt 之後的 value 是否為 NaN,如果是則會拋出 NotAcceptableException:
import { ArgumentMetadata, Injectable, NotAcceptableException, PipeTransform } from '@nestjs/common';

@Injectable()
export class ParseIntPipe implements PipeTransform<string, number> {
  transform(value: string, metadata: ArgumentMetadata) {
    const integer = parseInt(value);
    if ( isNaN(integer) ) {
      throw new NotAcceptableException('無法解析為數字');
    }
    return integer;
  }
}
接著去修改 app.controller.ts,來套用看看自己設計的 ParseIntPipe:
import { Controller, Get, Param } from '@nestjs/common';
import { AppService } from './app.service';
import { ParseIntPipe } from './pipes/parse-int.pipe';

@Controller()
export class AppController {
  constructor(private readonly appService: AppService) {}

  @Get(':id')
  getUser(
    @Param('id', ParseIntPipe) id: number
  ) {
    return this.appService.getUser(id)
  }

}
透過瀏覽器查看 http://localhost:3000/HAO 會得到下方結果:
{
  "statusCode": 406,
  "message": "無法解析為數字",
  "error": "Not Acceptable"
}
小結
Pipe 在資料驗證這塊是非常實用的功能,不過如果有物件類型的資料要如何驗證呢?這部分我留到下篇再詳細說明。附上今天的懶人包:
- Pipe 經常用在資料驗證與型別轉換。
- Nest 有內建六個 Pipe。
- 內建 Pipe 可以自訂 HttpCode 或 Exception。
- Pipe 就是一個帶有
@Injectable的class,它要去實作PipeTransform這個介面。
遇到物件格式的資料要如何做驗證這個問題,事實上這個解法只需要使用 DTO、
ValidationPipe、class-validator 以及 class-transformer ,這裡先完成簡單的前置作業,透過npm安裝class-validator與class-transformer:⭐️ 透過 class 去作資料驗証,看起來非常的方便
DTO 格式驗證
為了模擬驗證機制,這裡先產生一個 TodoModule 與 TodoController:
$ nest generate module features/todo
$ nest generate controller features/todo
接著,在 features/todo 下新增 dto 資料夾,並建立 create-todo.dto.ts:
在驗證格式機制上,必須要採用 class 的形式建立 DTO,原因在Controller(下)這篇有提過,如果採用 interface 的方式在編譯成 JavaScript 時會被刪除,如此一來,Nest 便無法得知 DTO 的格式為何。這裡�我們先簡單定義一下 create-todo.dto.ts 的內容:
export class CreateTodoDto {
    public readonly title: string;
    public readonly description?: string;
}
我希望 title 的規則如下:
- 為必填
- 必須是
String - 最大長度為 20
description 的規則如下:
- 為選填
- 必須是
String
那要如何套用這些規則呢?非常簡單,透過 class-validator 就能辦到,主要是替這些屬性添加特定的裝飾器:
import { IsNotEmpty, IsOptional, IsString, MaxLength } from "class-validator";

export class CreateTodoDto {
    @MaxLength(20)
    @IsString()
    @IsNotEmpty()
    public readonly title: string;

    @IsString()
    @IsOptional()
    public readonly description?: string;
}
提醒:詳細的裝飾器內容可以參考 class-validator。
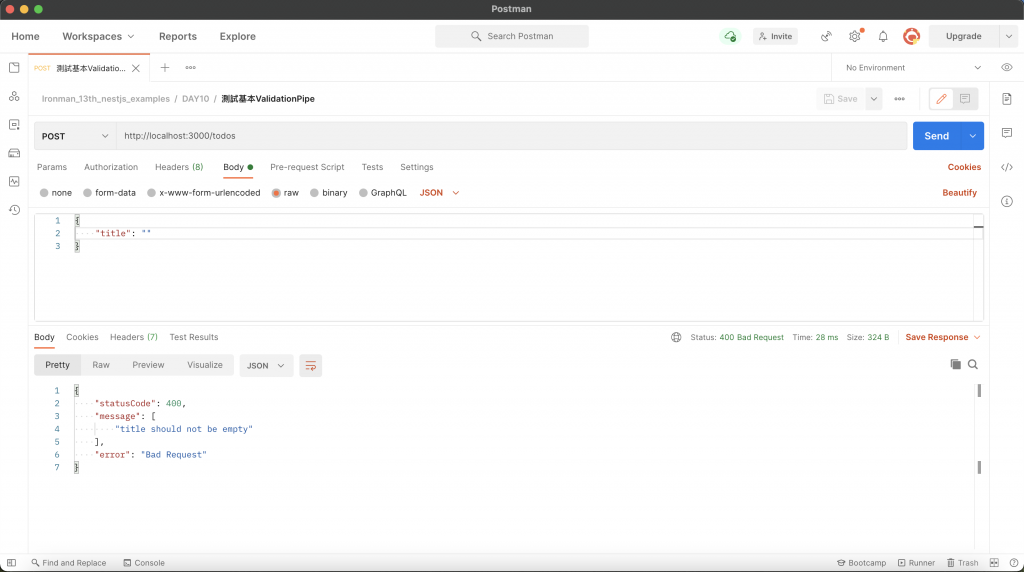
如此一來便完成了規則的定義,實在是太好用啦!接下來只需要在資源上透過 @UsePipes裝飾器套用 ValidationPipe 即可:
import { Body, Controller, Post, UsePipes, ValidationPipe } from "@nestjs/common";
import { CreateTodoDto } from "./dto/create-todo.dto";

@Controller("todos")
export class TodoController {
    @Post()
    @UsePipes(ValidationPipe)
    create(@Body() dto: CreateTodoDto) {
        return {
            id: 1,
            ...dto,
        };
    }
}
在 Controller 層級套用也可以,就會變成該 Controller 下的所有資源都支援驗證:
import { Body, Controller, Post, UsePipes, ValidationPipe } from "@nestjs/common";
import { CreateTodoDto } from "./dto/create-todo.dto";

@Controller("todos")
@UsePipes(ValidationPipe)
export class TodoController {
    @Post()
    create(@Body() dto: CreateTodoDto) {
        return {
            id: 1,
            ...dto,
        };
    }
}
透過 Postman 來測試,會發現順利報錯:
關閉錯誤細項
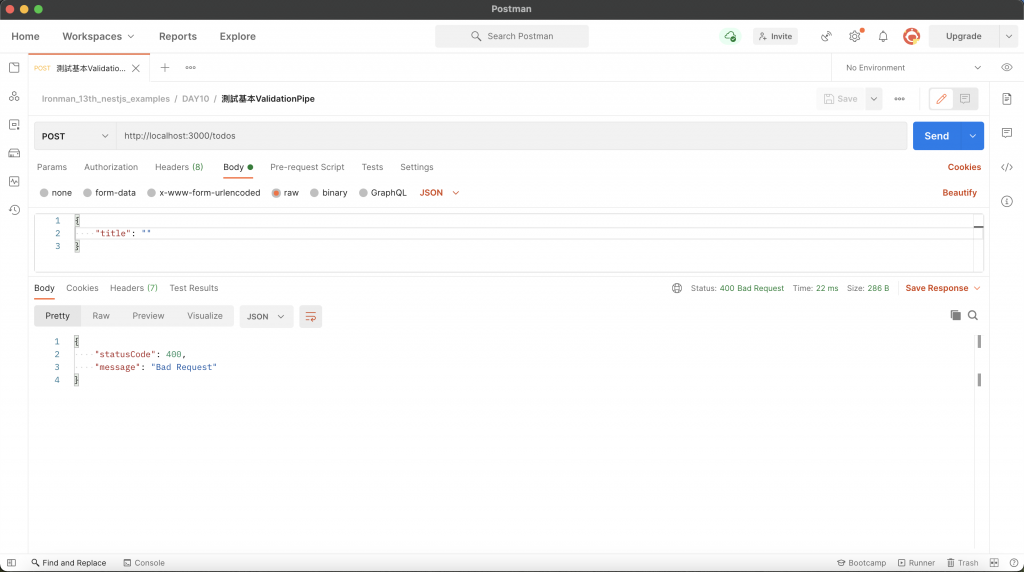
如果不想要回傳錯誤的項目,可以透過 ValidationPipe 的 disableErrorMessages 來關閉:
import { Body, Controller, Post, UsePipes, ValidationPipe } from "@nestjs/common";
import { CreateTodoDto } from "./dto/create-todo.dto";

@Controller("todos")
export class TodoController {
    @Post()
    @UsePipes(new ValidationPipe({ disableErrorMessages: true }))
    create(@Body() dto: CreateTodoDto) {
        return {
            id: 1,
            ...dto,
        };
    }
}
透過 Postman 進行測試:
自訂 Exception
與其他 Pipe 一樣可以透過 exceptionFactory 自訂 Exception:
import { Body, Controller, HttpStatus, NotAcceptableException, Post, UsePipes, ValidationPipe } from "@nestjs/common";
import { ValidationError } from "class-validator";
import { CreateTodoDto } from "./dto/create-todo.dto";

@Controller("todos")
export class TodoController {
    @Post()
    @UsePipes(
        new ValidationPipe({
            exceptionFactory: (errors: ValidationError[]) => {
                return new NotAcceptableException({
                    code: HttpStatus.NOT_ACCEPTABLE,
                    message: "格式錯誤",
                    errors,
                });
            },
        })
    )
    create(@Body() dto: CreateTodoDto) {
        return {
            id: 1,
            ...dto,
        };
    }
}
透過 Postman 進行測試:

自動過濾屬性
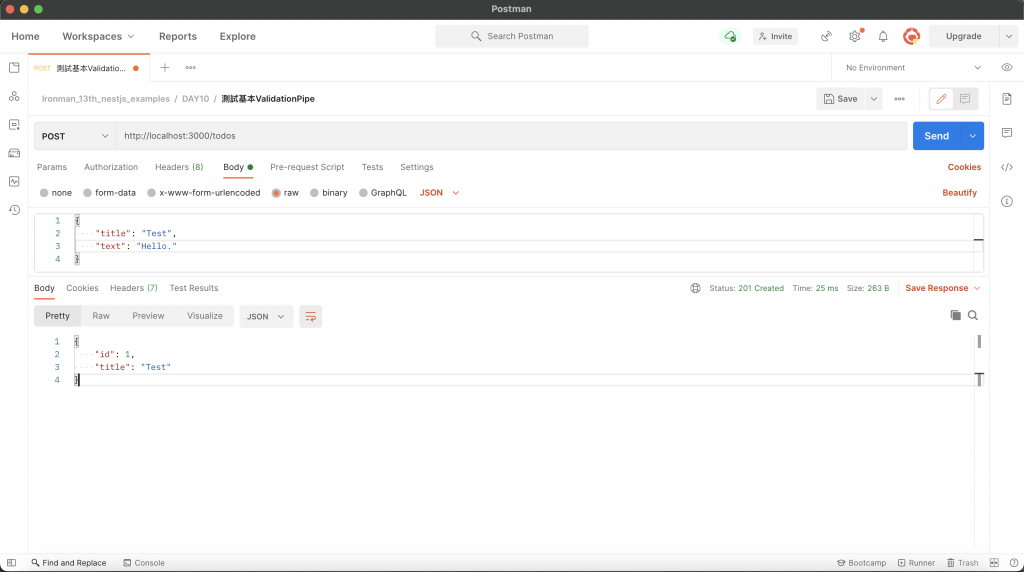
以前面新增 Todo 的例子來說,可接受的參數為 title 與 description,假設今天客戶端傳送下��方資訊:
{
    "title": "Test",
    "text": "Hello."
}
可以發現傳了一個毫無關聯的 text,這時候想要快速過濾掉這種無效參數該怎麼做呢?透過 ValidationPipe 設置 whitelist 即可,當 whitelist 為 true 時,會 自動過濾掉於 DTO 沒有任何裝飾器的屬性,也就是說,就算有該屬性但沒有添加 class-validator 的裝飾器也會被視為無效屬性。這裡我們簡單實驗一下 whitelist:
import { Body, Controller, Post, UsePipes, ValidationPipe } from "@nestjs/common";
import { CreateTodoDto } from "./dto/create-todo.dto";

@Controller("todos")
export class TodoController {
    @Post()
    @UsePipes(new ValidationPipe({ whitelist: true }))
    create(@Body() dto: CreateTodoDto) {
        return {
            id: 1,
            ...dto,
        };
    }
}
透過 Postman 進行測試:
如果想要傳送無效參數時直接報錯的話,則是同時使用 whitelist 與 forbidNonWhitelisted:
import { Body, Controller, Post, UsePipes, ValidationPipe } from "@nestjs/common";
import { CreateTodoDto } from "./dto/create-todo.dto";

@Controller("todos")
export class TodoController {
    @Post()
    @UsePipes(new ValidationPipe({ whitelist: true, forbidNonWhitelisted: true }))
    create(@Body() dto: CreateTodoDto) {
        return {
            id: 1,
            ...dto,
        };
    }
}
透過 Postman 進行測試:

自動轉換
ValidationPipe 還提供 transform 參數來轉換傳入的物件�,將其實例化為對應的 DTO:
import { Body, Controller, Post, UsePipes, ValidationPipe } from "@nestjs/common";
import { CreateTodoDto } from "./dto/create-todo.dto";

@Controller("todos")
export class TodoController {
    @Post()
    @UsePipes(new ValidationPipe({ transform: true }))
    create(@Body() dto: CreateTodoDto) {
        console.log(dto);
        return dto;
    }
}
透過 Postman 進行測試,會在終端機看到下方結果,會發現 dto 為 CreateTodoDto 實例:
CreateTodoDto { title: 'Test' }
transform 還有一個很厲害的功能,還記得如何取得路由參數嗎?假設路由參數要取得 id,這個 id 型別是 number,但正常來說路由參數收到的時候都會是 string,透過 transform Nest 會嘗試去轉換成我們指定的型別:
import { Controller, Get, Param, UsePipes, ValidationPipe } from "@nestjs/common";

@Controller("todos")
export class TodoController {
    @Get(":id")
    @UsePipes(new ValidationPipe({ transform: true }))
    get(@Param("id") id: number) {
        console.log(typeof id);
        return "";
    }
}
透過瀏覽器存取 http://localhost:3000/1,會在終端機看到型別確實轉換成 number 了:
number;
檢測陣列 DTO
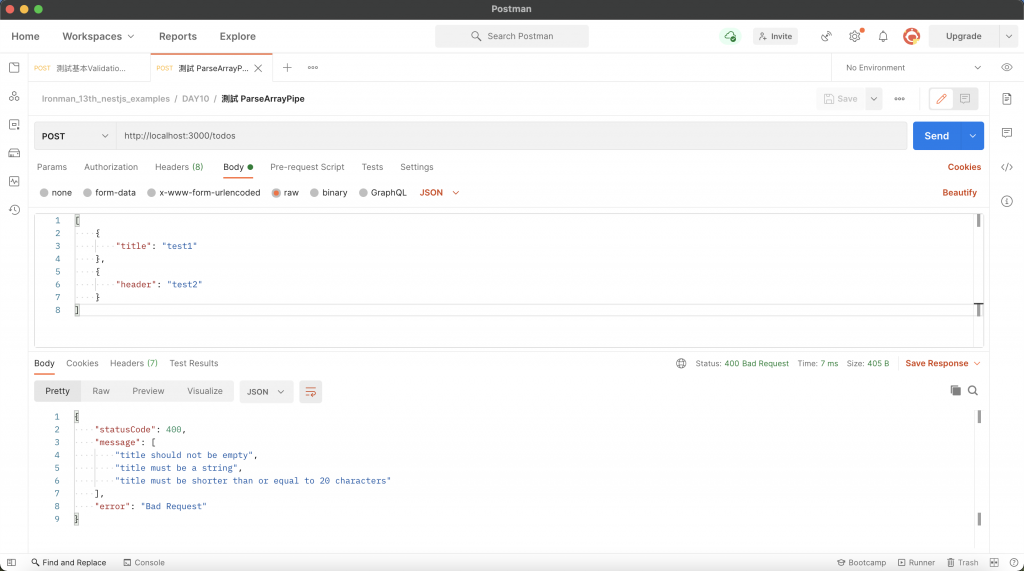
如果傳入的物件為陣列格式,不能使用 ValidationPipe,要使用 ParseArrayPipe,並在 items 帶入其 DTO:
import { Body, Controller, ParseArrayPipe, Post } from "@nestjs/common";
import { CreateTodoDto } from "./dto/create-todo.dto";

@Controller("todos")
export class TodoController {
    @Post()
    create(
        @Body(new ParseArrayPipe({ items: CreateTodoDto }))
        dtos: CreateTodoDto[]
    ) {
        return dtos;
    }
}
透過 Postman 進行測試:
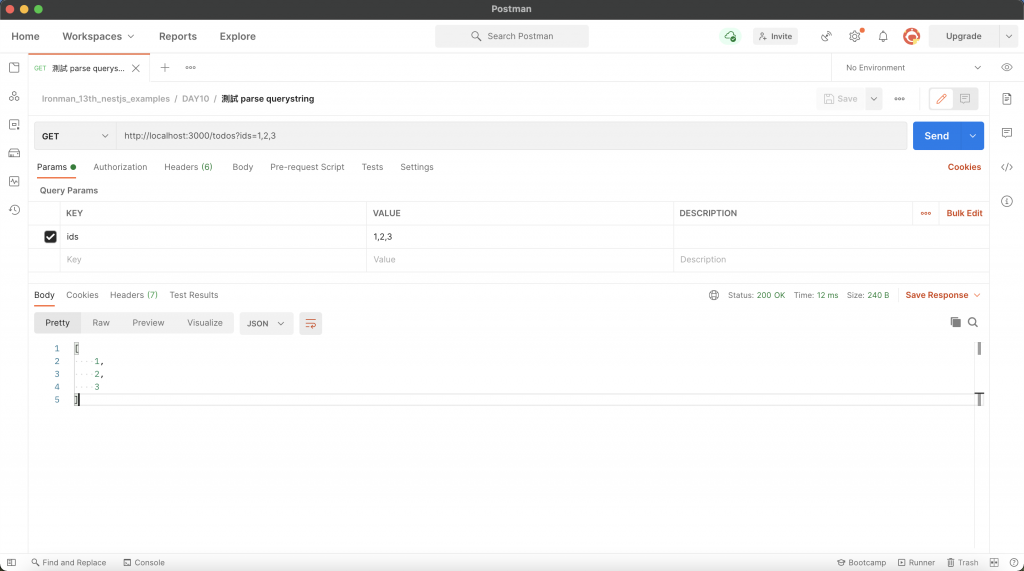
解析查詢參數
ParseArrayPipe 還可以用來解析查詢參數,假設查詢參數為 ?ids=1,2,3,此時就可以善用此方法來解析出各個 id,只需要添加 separator 去判斷以什麼作為分界點:
import { Controller, Get, ParseArrayPipe, Query } from "@nestjs/common";

@Controller("todos")
export class TodoController {
    @Get()
    get(
        @Query("ids", new ParseArrayPipe({ items: Number, separator: "," }))
        ids: number[]
    ) {
        return ids;
    }
}
透過 Postman 進行測試:
DTO 技巧
當系統越來越龐大的時候,DTO 的數量也會隨之增加,有許多的 DTO 會有重複的屬性,例如:相同資源下的 CRUD DTO,這時候就會變得較難維護,還好 Nest 有提供良好的解決方案,運用特殊的繼承方式來處理:
局部性套用 (Partial)
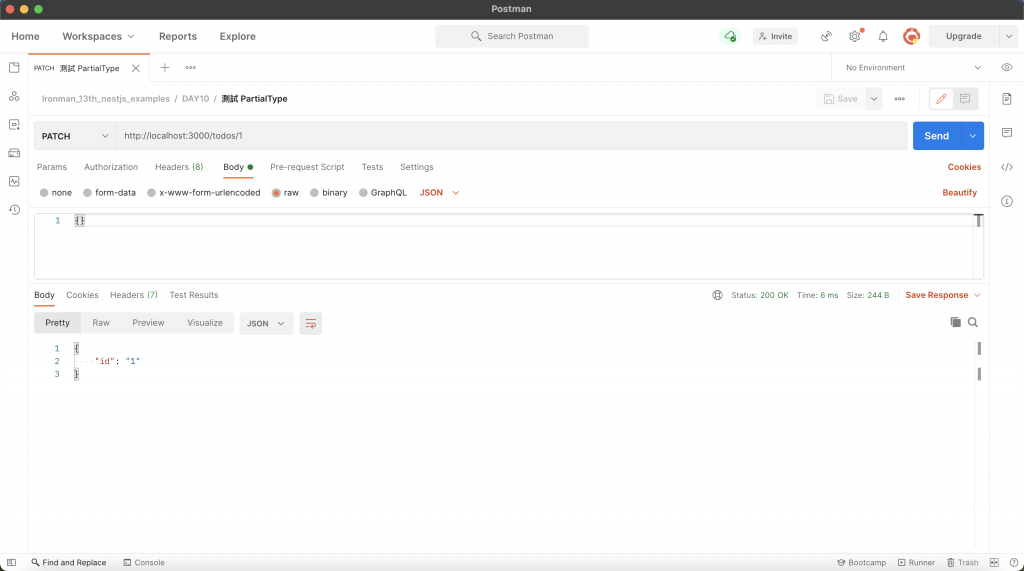
局部性套用的意思是將既有的 DTO 所有欄位都取用,只是全部轉換為非必要屬性,需要使用到 PartialType 這個函式來把要取用的 DTO 帶進去,並給新的 DTO 繼承。這邊我們先建立一個 update-todo.dto.ts 在 dto 資料夾中,並讓它繼承 CreateTodoDto 的欄位:
import { PartialType } from "@nestjs/mapped-types";
import { CreateTodoDto } from "./create-todo.dto";

export class UpdateTodoDto extends PartialType(CreateTodoDto) {}
其效果相當於:
import { IsNotEmpty, IsOptional, IsString, MaxLength } from "class-validator";

export class UpdateTodoDto {
    @MaxLength(20)
    @IsString()
    @IsNotEmpty()
    @IsOptional()
    public readonly title?: string;

    @IsString()
    @IsOptional()
    public readonly description?: string;
}
接著來修改 todo.controller.ts:
import { Body, Controller, Param, Patch, UsePipes, ValidationPipe } from "@nestjs/common";
import { UpdateTodoDto } from "./dto/update-todo.dto";

@Controller("todos")
export class TodoController {
    @Patch(":id")
    @UsePipes(ValidationPipe)
    update(@Param("id") id: number, @Body() dto: UpdateTodoDto) {
        return {
            id,
            ...dto,
        };
    }
}
透過 Postman 進行測試,這邊我不帶任何值去存取 PATCH /todos/:id,會發現可以通過驗證:
選擇性套用 (Pick)
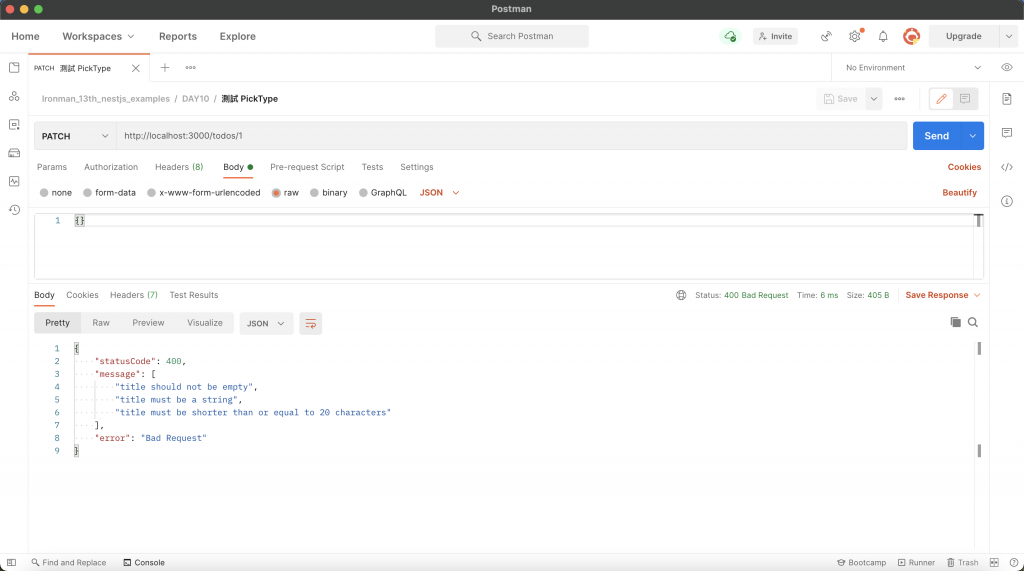
選擇性套用的意思是用既有的 DTO 去選擇哪些是會用到的屬性,需要使用到 PickType 這個函式來把要取用的 DTO 帶進去以及指定要用的屬性名稱,並給新的 DTO 繼承。這邊我們沿用 UpdateTodoDto 並讓它繼承 CreateTodoDto 的 title 欄位:
import { PickType } from "@nestjs/mapped-types";
import { CreateTodoDto } from "./create-todo.dto";

export class UpdateTodoDto extends PickType(CreateTodoDto, ["title"]) {}
其效果等同於:
import { IsNotEmpty, IsString, MaxLength } from "class-validator";

export class UpdateTodoDto {
    @MaxLength(20)
    @IsString()
    @IsNotEmpty()
    public readonly title: string;
}
todo.controller.ts 沿用前面的範例:
import { Body, Controller, Param, Patch, UsePipes, ValidationPipe } from "@nestjs/common";
import { UpdateTodoDto } from "./dto/update-todo.dto";

@Controller("todos")
export class TodoController {
    @Patch(":id")
    @UsePipes(ValidationPipe)
    update(@Param("id") id: number, @Body() dto: UpdateTodoDto) {
        return {
            id,
            ...dto,
        };
    }
}
透過 Postman 進行測試,這邊我不帶任何值去存取 PATCH /todos/:id,會發現無法通過驗證:
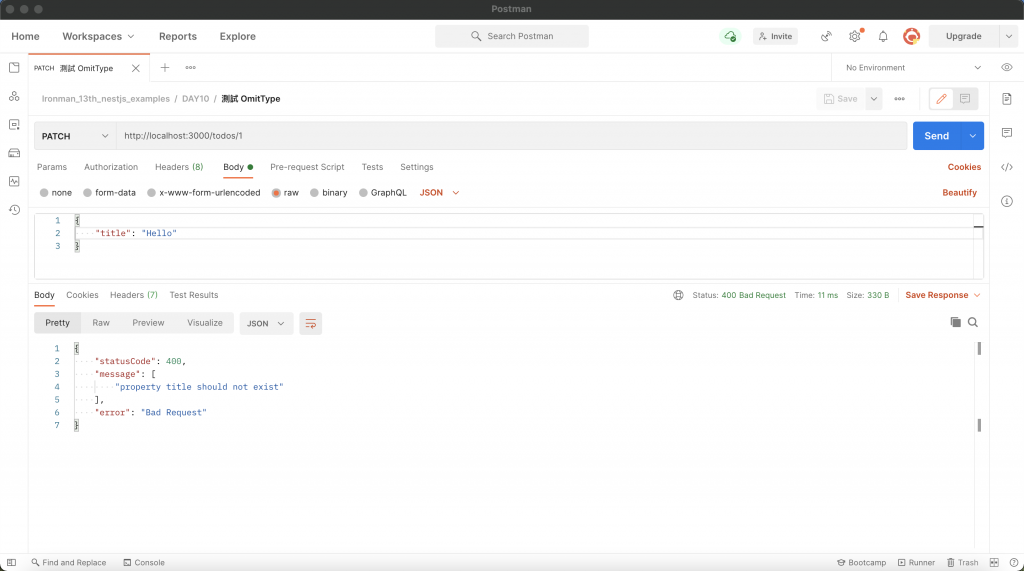
忽略套用 (Omit)
忽略套用的意思是用既有的 DTO 但忽略不會用到的屬性,需要使用到 OmitType 這個函式來把要取用的 DTO 帶進去以及指定要忽略的屬性名稱,並給新的 DTO 繼承。這邊我們沿用 UpdateTodoDto 並讓它繼承 CreateTodoDto 的欄位,但忽略 title 屬性:
import { OmitType } from "@nestjs/mapped-types";
import { CreateTodoDto } from "./create-todo.dto";

export class UpdateTodoDto extends OmitType(CreateTodoDto, ["title"]) {}
其效果等同於:
import { IsOptional, IsString } from "class-validator";

export class UpdateTodoDto {
    @IsString()
    @IsOptional()
    public readonly description?: string;
}
這裡稍微調整一下 todo.controller.ts,將 whitelist 與 forbidNonWhitelisted 設為 true:
import { Body, Controller, Param, Patch, UsePipes, ValidationPipe } from "@nestjs/common";
import { UpdateTodoDto } from "./dto/update-todo.dto";

@Controller("todos")
export class TodoController {
    @Patch(":id")
    @UsePipes(new ValidationPipe({ whitelist: true, forbidNonWhitelisted: true }))
    update(@Param("id") id: number, @Body() dto: UpdateTodoDto) {
        return {
            id,
            ...dto,
        };
    }
}
透過 Postman 進行測試,這邊我刻意帶 title 去存取 PATCH /todos/:id,由於設置了 whitelist 與 forbidNonWhitelisted,所以無法通過驗證:
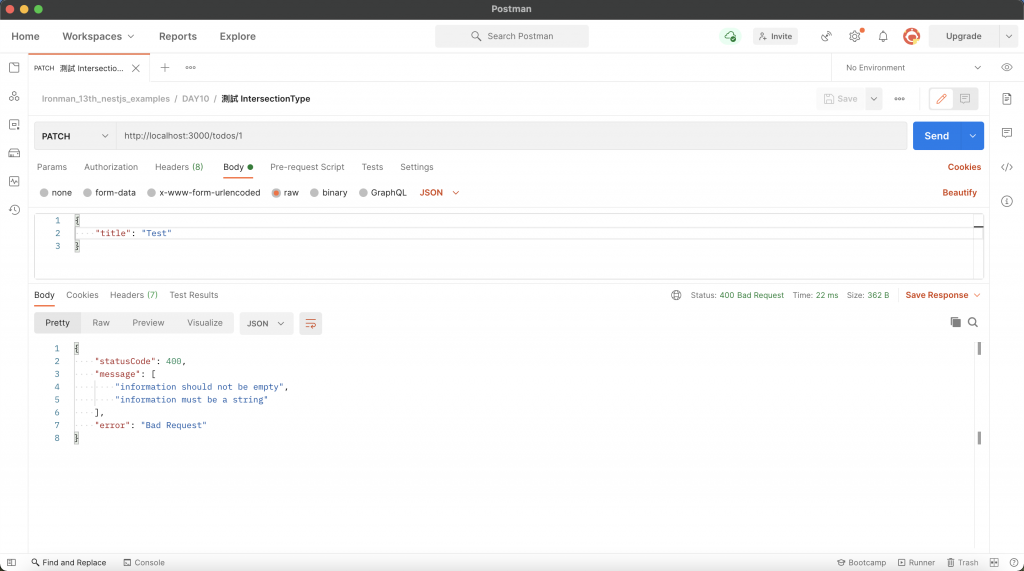
合併套用 (Intersection)
合併套用的意思是用既有的兩個 DTO 來合併屬性,需要使用到 IntersectionType 這個函式來把要取用的兩個 DTO 帶進去,並給新的 DTO 繼承。這邊我們沿用 CreateTodoDto 並在 update-todo.dto.ts 新增一個 MockDto,再讓 UpdateTodoDto 去繼承這兩個的欄位:
import { IntersectionType } from "@nestjs/mapped-types";
import { IsNotEmpty, IsString } from "class-validator";
import { CreateTodoDto } from "./create-todo.dto";

export class MockDto {
    @IsString()
    @IsNotEmpty()
    public readonly information: string;
}

export class UpdateTodoDto extends IntersectionType(CreateTodoDto, MockDto) {}
其效果等同於:
import { IsNotEmpty, IsOptional, IsString, MaxLength } from "class-validator";

export class UpdateTodoDto {
    @MaxLength(20)
    @IsString()
    @IsNotEmpty()
    public readonly title: string;

    @IsString()
    @IsOptional()
    public readonly description?: string;

    @IsString()
    @IsNotEmpty()
    public readonly information: string;
}
這裡調整一下 todo.controller.ts:
import { Body, Controller, Param, Patch, UsePipes, ValidationPipe } from "@nestjs/common";
import { UpdateTodoDto } from "./dto/update-todo.dto";

@Controller("todos")
export class TodoController {
    @Patch(":id")
    @UsePipes(ValidationPipe)
    update(@Param("id") id: number, @Body() dto: UpdateTodoDto) {
        return {
            id,
            ...dto,
        };
    }
}
透過 Postman 進行測試,這邊我刻意不帶 information 去存取 PATCH /todos/:id,所以無法通過驗證:
組合應用
上述的四個函式:PartialType、PickType、OmitType、IntersectionType 是可以透過組合的方式來使用的。下方的範例使用 OmitType 將 CreateTodoDto 的 title 欄位去除,並使用 IntersectionType 把 MockDto 與之合併 :
import { IntersectionType, OmitType } from "@nestjs/mapped-types";
import { IsNotEmpty, IsString } from "class-validator";
import { CreateTodoDto } from "./create-todo.dto";

export class MockDto {
    @IsString()
    @IsNotEmpty()
    public readonly information: string;
}

export class UpdateTodoDto extends IntersectionType(OmitType(CreateTodoDto, ["title"]), MockDto) {}
其效果等同於:
import { IsNotEmpty, IsOptional, IsString } from "class-validator";

export class UpdateTodoDto {
    @IsString()
    @IsOptional()
    public readonly description?: string;

    @IsString()
    @IsNotEmpty()
    public readonly information: string;
}
todo.controller.ts 保持本來的樣子:
import { Body, Controller, Param, Patch, UsePipes, ValidationPipe } from "@nestjs/common";
import { UpdateTodoDto } from "./dto/update-todo.dto";

@Controller("todos")
export class TodoController {
    @Patch(":id")
    @UsePipes(ValidationPipe)
    update(@Param("id") id: number, @Body() dto: UpdateTodoDto) {
        return {
            id,
            ...dto,
        };
    }
}
透過 Postman 進行測試,這邊我不帶任何值去存取 PATCH /todos/:id,會發現無法通過驗證:

全域 Pipe
ValidationPipe 算是一個蠻常用的功能,因為大多數的情況都會使用到 DTO 的概念,如此一來便可以使用 DTO 驗證的方式去檢查資料的正確性,所以可以直接將 ValidationPipe 配置在全域,僅需要修改 main.ts 即可:
import { ValidationPipe } from "@nestjs/common";
import { NestFactory } from "@nestjs/core";
import { AppModule } from "./app.module";

async function bootstrap() {
    const app = await NestFactory.create(AppModule);
    app.useGlobalPipes(new ValidationPipe());
    await app.listen(3000);
}
bootstrap();
透過 useGlobalPipes 使 ValidationPipe 適用於全域,實在是非常方便!
依賴注入實作全域 Pipe
上面的方法是透過模組外部完成全域配置的,與 Exception filter 一樣可以用依賴注入的方式,透過指定 Provider 的 token 為 APP_PIPE 來實現,這裡是用 useClass 來指定要建立實例的類別:
import { Module, ValidationPipe } from "@nestjs/common";
import { APP_PIPE } from "@nestjs/core";
import { AppController } from "./app.controller";
import { AppService } from "./app.service";
import { TodoModule } from "./features/todo/todo.module";

@Module({
    imports: [TodoModule],
    controllers: [AppController],
    providers: [
        AppService,
        {
            provide: APP_PIPE,
            useClass: ValidationPipe,
        },
    ],
})
export class AppModule {}
小結
ValidationPipe 與 DTO 的驗證機制十分好用且重要,任何的 API 都需要做好完善的資料檢查,才能夠降低帶來的風險。這裡附上今天的懶人包:
ValidationPipe需要安裝class-validator及class-transformer。- 透過
ValidationPipe可以實現 DTO 格式驗證。 ValidationPipe可以透過disableErrorMessages關閉錯誤細項。ValidationPipe一樣可以透過exceptionFactory自訂 Exception。ValidationPipe可以透過whitelist來過濾無效參數,如果接收到無效參數想要回傳錯誤的話,還需要額外啟用forbidNonWhitelisted。ValidationPipe可以透過transform來達到自動轉換型別的效果。- 用
ParseArrayPipe解析陣列 DTO 以及查詢參數。 - DTO 可以透過
PartialType、PickType、OmitType、IntersectionType這四個函式來重用 DTO 的欄位。 - 全域 Pipe 可以透過依賴注入的方式實作。